Stitcher's Desk Caddy
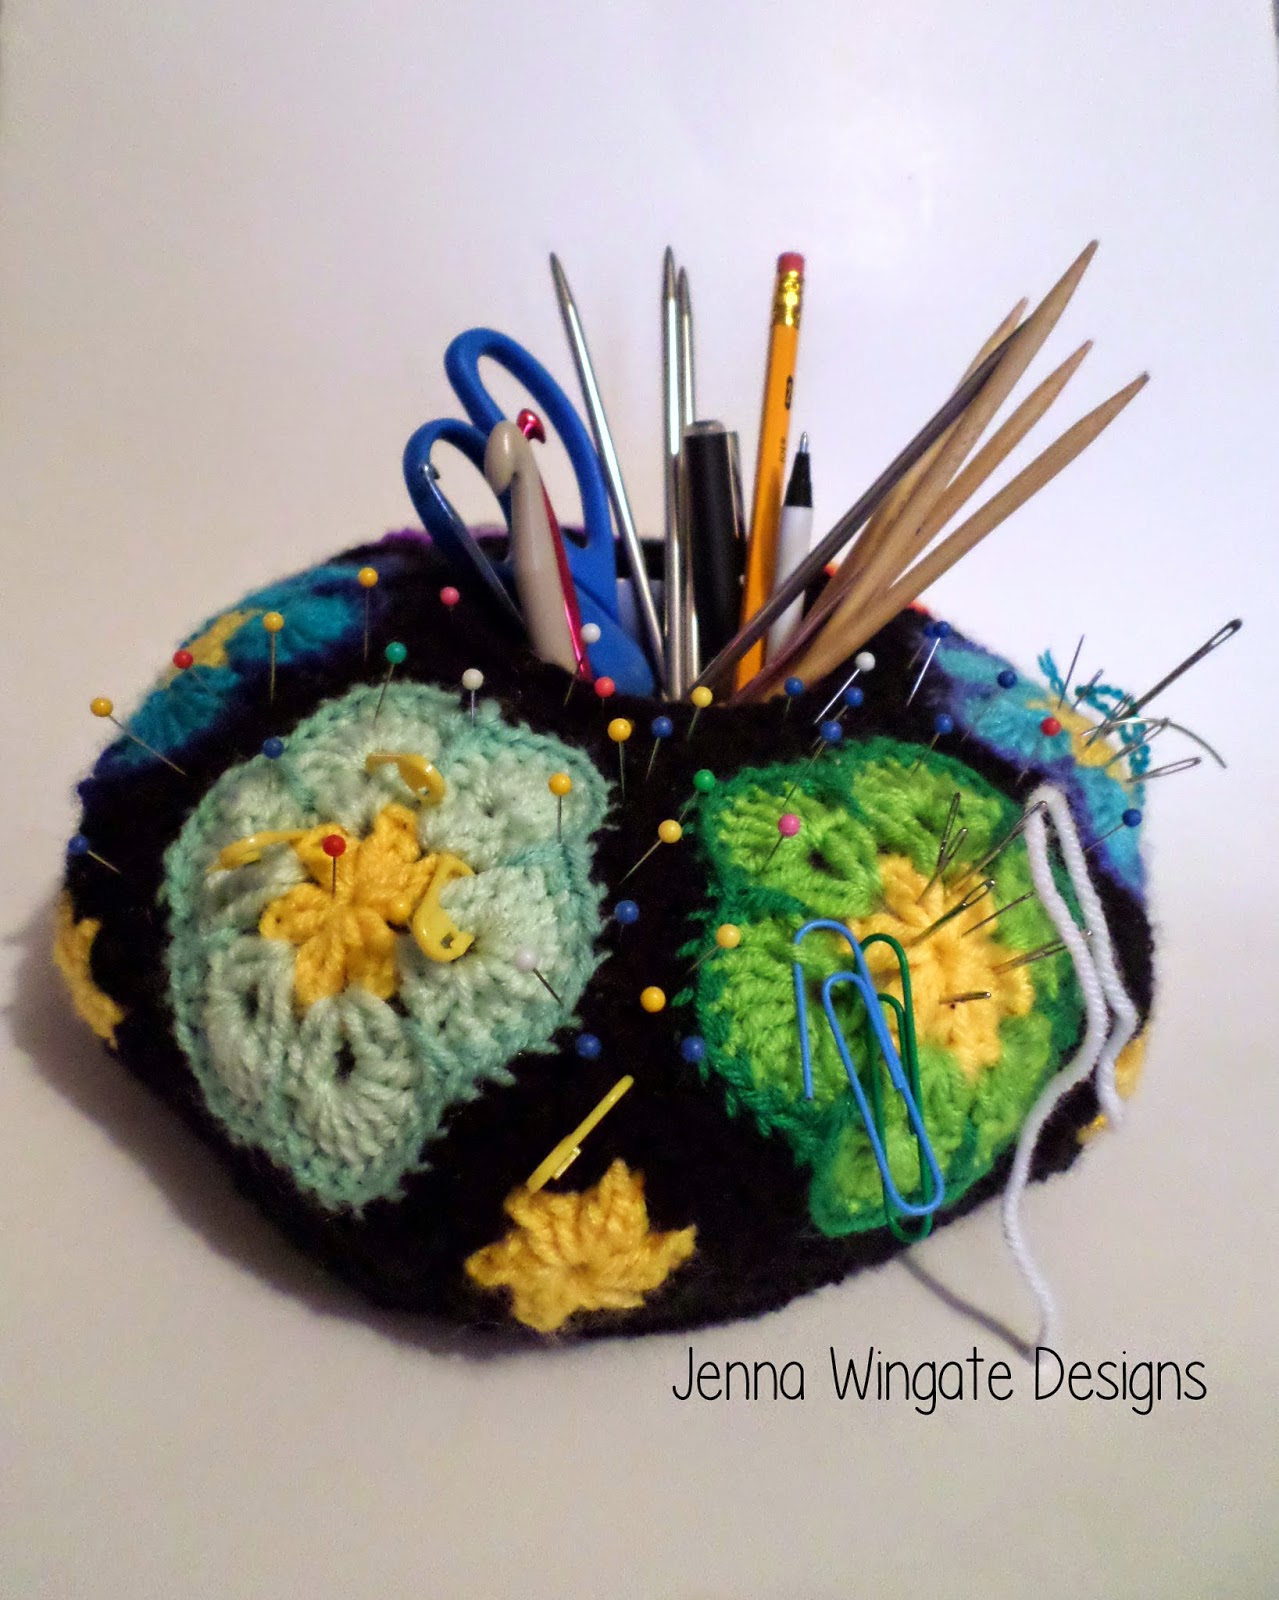
Stitcher's Desk Caddy
By Jenna Wingate

American Crochet Terms
Finished Size: 10" wide by 4" tall
Skill Level: Easy-Intermediate
Utilizes a few stitches that may be new to some, but handy links included.
Gauge:
With G hook - 4" = 14hdc x 11 rows
Hex with F hook - 4.25" across
Note on gauge: Gauge is not super important as long as you remember to change hooks for the pieces to be in the right proportion. However, a larger or smaller cup opening may mean you will have to look for a different size insert other than the one I suggest.

MR - Magic Ring
Sc - single crochet
Hdc - half double crochet
Dc - double crochet
Ch - Chain
Slst - Slipstitch
BLO - Back Loop Only (Link)
FLO - Front Loop Only (Link)
FO - Finish Off
Special Stitches:
- Hdcskdec - Half double crochet skip decrease - This is a half double crochet decrease made over three stitches by skipping the stitch in the middle. Yarn over, insert hook in first stitch and pull up a loop. Yarn over and pull through 2 loops on the hook. Yarn over and insert hook in the 3rd stitch (skipping the second stitch). Yarn over and pull through all 3 loops on the hook.
- Spst - Spike Stitch - Sc into a row below-in this case you will sc between the the shells on round 2. (refer to pictures as needed) (Link)
Materials:
#4 (Medium, Worsted Weight) yarn
- 100-120yards of the main color (MC)
- Small amounts in accent colors (AC1 - AC3)
Polyester Fiberfill stuffing (about 4-5 ounces)
Crochet Hooks
- G/6 4.00mm
- F/5 3.75mm
Tapestry Needle
Container measuring 9.5 inches around and 3-3.5 inches tall
Scrap bit of cardboard about 12inches wide
Utility or craft knife or very strong scissors
Optional Materials:
Soda/water bottle caps
Stretchy Material to match MC (or close)
10 or so straight pins
Sewing needle and thread
More info on the recycled materials I used within the pattern.

F hook
Hexes are made from the right side in joined rounds,
1. (AC1) (ch3, dc, ch1) then (2dc, ch1) 5 times in a MR. Join with a slst to the top of the ch3. FO. (6 clusters, 6ch1 spaces)
2. Join (AC2) in any ch1 space. (Ch3, dc, ch1, 2dc) in first space. (2dc, ch1, 2dc) in each of the other ch1 spaces. Join with a slst to beginning ch3. Do not FO. (6 shells)
3. Slst over to ch1 space. (Ch3, 6dc) in same ch1 space. (7dc) in each of the other ch1 spaces. Join with a slst to the beginning ch3. FO. (42 stitches)
4. Join (AC3) in any stitch. Sc in each of the 7 double crochets and Spst (see stitches used) between the shells on round 2. Repeat around and join with a slst to beginning sc. FO. (48stitches)
5. Join (MC) in the back loop of the last stitch of any set of 7sc. Working entirely in the back loops. Ch1, hdcskdec BLO (see stitches used) over the next 3 stitches. Sc BLO in the next 2 stitches. (Sc, ch1, sc) BLO in the next stitch. Sc BLO in the next 2 stitches. Repeat from * around. Join with a slst to beginning hdcskdec. FO, leaving a long tail for sewing.

F hook
Triangles are made from the right side in joined rounds.
1. Same as round 1 of Hex. FO (AC1) (6 clusters, 6 ch1 spaces)
2. Join (MC) in any ch1 space. Ch1, *(Hdc, sc, hdc) in the same space. (2dc, ch2, 2dc) in the next space. Repeat from * twice more. Join with a slst to beginning hdc and FO, leaving a long tail for sewing.
Note about ends:
Since I never intend to wash this (it contains cardboard) I didn't sew my ends. I double knotted them in pairs and trimmed them off. You can't see them and it saved me a lot of time. This is a cheat I would only use for something I make for myself, so use your own discretion!
Caddy Base
G hook
Caddy base is made in joined rounds all from the right side, The bottom half is made connected directly to the top half.
Top Half
1. Ch1 and 10 hdc in a MR. Join with a slst to beginning hdc. Ch1. (10)
2. 2hdc in each stitch around. Join, ch1. (20)
3. (2hdc in the next stitch, hdc in the next) 10 times. Join, ch1. (30)
4. (2hdc in the next stitch, hdc in the next 4 stitches. Join, ch1. (36)
5. Hdc BLO in each stitch around. Join, ch1. (36)
6. - 15. Hdc in each stitch around. Join, ch1. (36)
16. Working in the front loops only, *hdc FLO in the next 5 stitches. (dc, ch1, dc) FLO in the next stitch. Repeat from * 6 more times. Join with a slst to beginning hdc, FO. The top row of the base is now a hex-shape. (48 stitches, 6ch1 spaces)
Bottom Half
1. Working into the free loops at the bottom (from where you crocheted BLO on round 5) Join (MC) with a slst into any free loop. *2hdc in the first loop, hdc in the next 2 loops. Repeat from * 11 more times. Join with a slst to beginning hdc. Ch1. (48)
2. (2hdc in the first loop, hdc in the next 3 loops.) 12 times. Join, ch1. (60)
3. (2hdc in the first loop, hdc in the next 4 loops) 12 times.Join, ch1. (72)
4. (2hdc in the first loop, hdc in the next 5 loops) 12 times. Join, ch1. (84)
5. 2hdc in the first loop, hdc in the next 6 loops) 12 times. Join, FO. (96)
Stabilizer
 |
| White cats = big helpers. They just don't like getting their paws dirty. |
Center the bottom of your container (I used a Pringles can, cleaned, that I cut down to 3.5" tall*) in the middle of the circle you just drew and draw around it, too. You now have what looks like a drawing of a flat doughnut.
Cut out your pattern and then trace it onto your cardboard. Using your utility knife or other dangerously sharp cutting device, cut out both circles.
*If you have a pretty jar or cup the right size then it probably won't matter if it is a little too tall. A cut-off Pringles can is not pretty, though, so I wanted it to be short enough that the edges didn't show.
Fabric Liner
I used an old T-shirt for this. Unfortunately I didn't have any black T-shirts I wanted to cut up, but I had a brown one I never wore and that was close enough. I traced the small circle into the center and cut that out. I cut the rest of the fabric into a really large circle (obviously too big so I could be sure it was big enough). I then cut the fabric from the outer edge to about 2 inches before the center circle- like slicing a pie- big wedges. Not sure how many I cut... lets say 8, since we referenced pie.


You could skip lining the thing if you really wanted to, but the African Violets really do leave big holes that stuffing will show through. Just if you do line it, use something stretchy so it gives when you stuff the caddy.
Sewing parts

Sew all the hexes and the triangles to the upper half of the base as follows:
The first Hex will have 1 side sewn to 1 side of the base
The second - fifth Hexes you will sew to 1 side of the base plus 1 side of the previous Hex
The sixth Hex will be sew to one side of the 1st Hex, the last available side of the base and 1 side of the previous Hex.
The triangles will go below the Hexes, 2 sides sewn to one side both of the Hexes it touches.
One side of each Hex and one side of each Triangle will be free. They won't be in a straight line, but don't worry- we are about to fix that. This is now the top of the caddy.
Edging the Top
F hook
1. Working into the bottom of the shapes now, join your (MC) yarn in the first stitch of a Hex. Ch1. Sc 7 stitches across the bottom of the Hex. Sc 9 stitches across the bottom of the Triangle. Repeat this all the way around for a total of 96 stitches. Join with a slst to the first sc and ch2. Do not turn.
2. *Dc in the first 7 stitches. Hdc in the next. sc in the next 7. Hdc in the next. Repeat from * all the way around. Join with a slst to beginning dc. Ch1, Do not turn.
3. Sc in each stitch around. Join and FO.

G hook
This is an optional step. Personally I hate how needles get lost in the pin cushion, so when planning such a big pin cushion I came up with a solution.
Using a couple of bottle caps I pulled out of the recycling bin, I crocheted a little holder for them and then attached them to the underneath side of a flower center so when I put my needles in they can only go in so far.
1. Ch2. 12dc in a MR. Join with a slst to beginning dc. Ch2, do not turn. (12)
2. Dc BLO in each stitch around. Join, ch1.
3. Sc in each stitch around. Join.
4. *Ch2. From the wrong side of a Hex, slst to the end of one of the Round 1 flower center petals. Ch2, slst into the next stitch of round 3 of the catcher. Slst in the next stitch. Repeat from * around, attaching to each spoke of the flower center. Stuff as much filler in there as you can and secure the end.
I did only 2 because I had 2 caps, but you can add as many as you like.


Fabric Liner

Be sure that the slits/wedges are turned to where you can work around the Needle Catchers.
 With needle and thread, sew the center hole to the top of the base all the way around.
Overlap the wedges of fabric, filling as many gaps as you can and pin them to the bottom edge of the base. Trim the excess off just a smidge shorter than the base.
Sew all the way around this part, too. Don't sew to the very edge because you still need to crochet into that.
I didn't stitch any of the overlaps closed, I really don't like sewing so I decided this was good enough at this point.
Here's what mine looked like completely stitched. Now I'm ready to put in the stabilizer and stuff/crochet the bottom closed.
Finishing
G hook

With the top of the caddy toward you, join your (MC) yarn in any stitch and crochet through the bottom row of the Top of Base and the bottom row of the Bottom of Base at the same time. Crochet a bit then stuff a bit. Repeat this until it's completely stuffed and crochet it closed. It's kind of a pain working with the cardboard there, but easier if you have the cardboard away from you rather than your hand bumping into it over and over.
Be sure that
1. It's stuffed really well. Doesn't need to be hard, but firm is good and even is a must!
2. Your Needle Catchers are positioned right and haven't gotten pushed over to the side.
Sew in any ends that are left. Insert your center container- might be hard to get it in there because of all the stuffing- but that's why we have the container to line it- because the stuffing wants to steal the middle.
Fill with all of your stuff and enjoy! The cat is definitely not knocking this one over and make you have to pick up all your hooks and pens for the third time that day. He might still pull all the pins out and drop them in the carpet, though. Put your shoes on when you get up in the morning. Maybe your cat is not as big a jerk as mine.
PRINTING, SAVING, PATTERN HELP There is a print-friendly button below which will also allow you to save this as a PDF. Please only ever print if absolutely necessary. Remember our rainforests. Please note that as a free pattern this pattern has not been tested. If you find any errors or areas that are unclear, please Email to let me know so I can correct them. If you have any questions or need crochet help that you cannot find through Google or Youtube, just Email. I cannot answer questions through blog comments. There is a contact form to the right if you prefer. Thanks for understanding. -Jenna
Pattern Usage:
Please do not copy or reproduce text or pictures. You are welcome to link here. Pattern is for personal use and gifting only. Please do not use this free pattern for profit. Thanks for your honesty.
I love your caddy and am now trying to make me one. Having a little trouble now but hopefully i will be able to get it. Thanks so much for the pattern.
ReplyDelete